Soil analysis part 3 – Mulching the polytunnels
It's time to take a look at the polytunnels in the third article about the soil analysis I did in my garden. The soil is doing well, but I need to make some changes to improve the overall quality of the polytunnel soil. And I plan to do it with (you guessed it), more mulch!
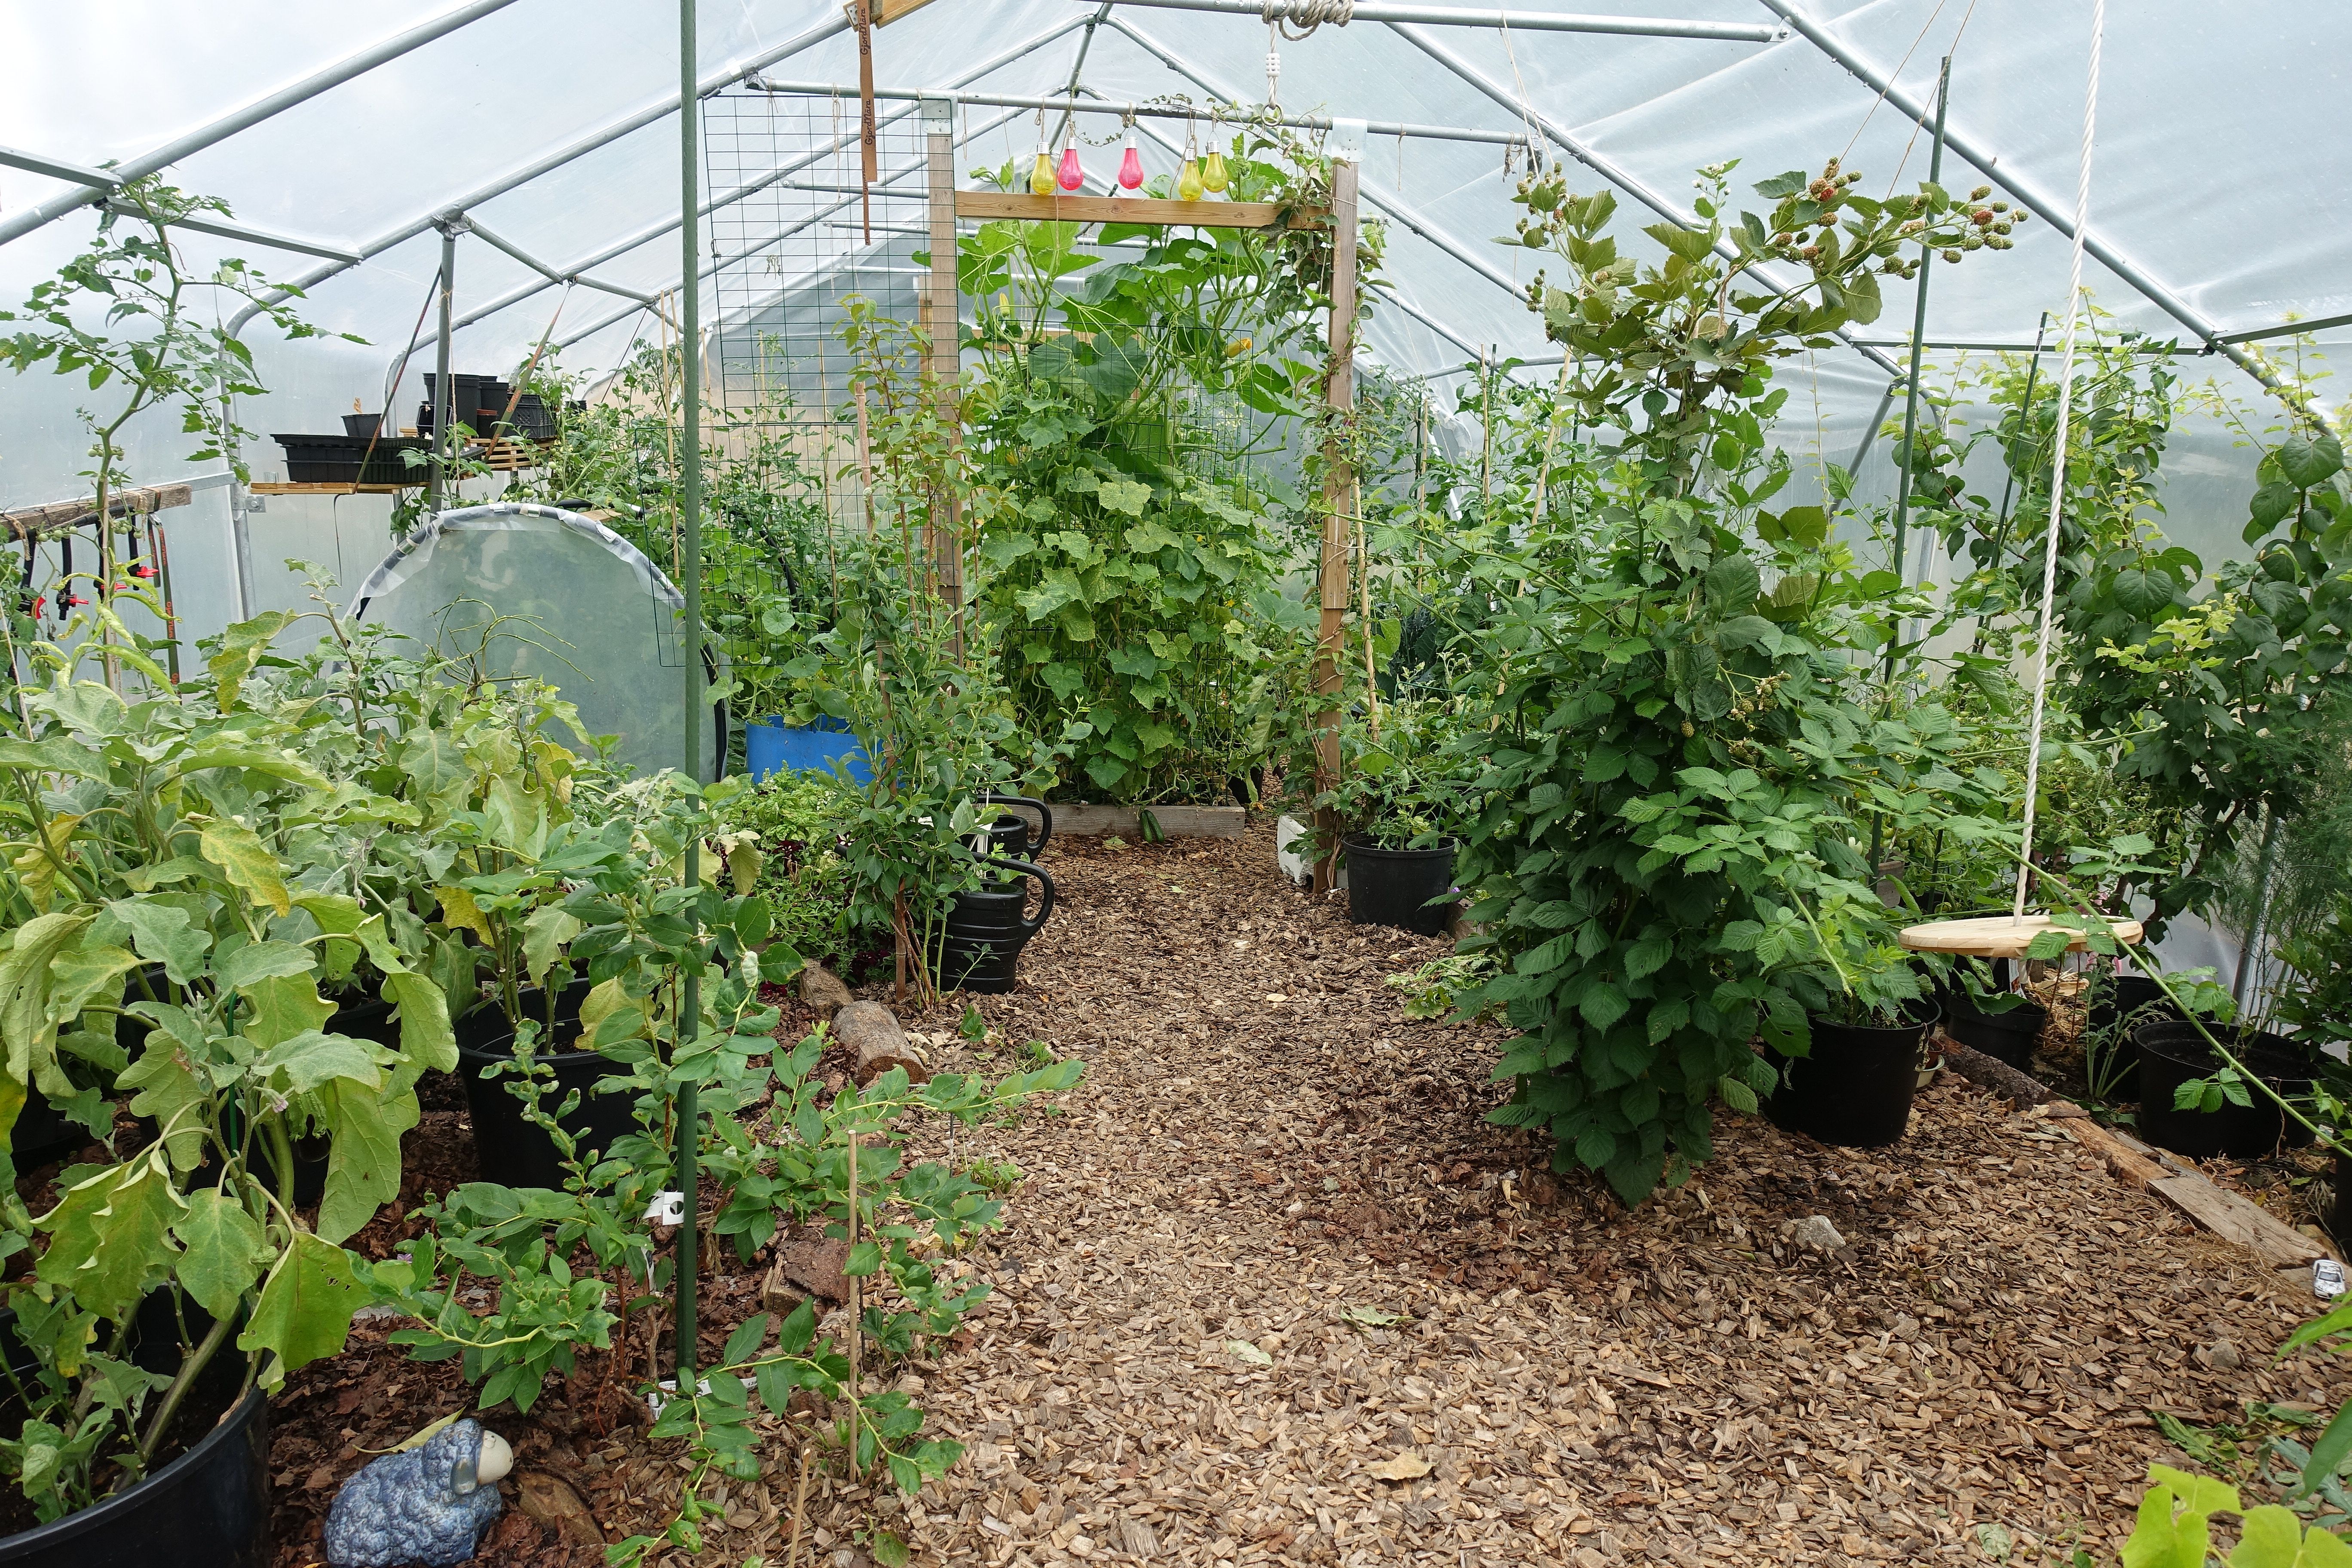
Summer in the polytunnel, July 2018.
It's time for part 3 of my series about the soil quality in my garden at Sara's Kitchen Garden!
I'm going to take a closer look at the test results from the samples that were taken in the polytunnel. The soil in the beds outside is really good, but I have some work to do to improve the quality of the polytunnel soil. The soil is still good, but it could be even better.
– I can see here that the soil conductivity is a bit lower in the polytunnel than in the beds outside. This tells me that there are less nutrients in this soil. This is still good quality soil though, says Anna Pettersson Skog from Sweco Environment AB.
I asked Anna to help me go through the results since I'm not used to analyzing these tests.
Soil analysis Part 1: Getting my soil tested
Soil analysis Part 2: Mulching works!
The polytunnel soil: An overview
I started using the first small polytunnel in the fall of 2014. We used to keep chickens here until spring 2015 and it wasn't until summer that year that I actually started growing vegetables in the polytunnel. The soil here was created from old straw that I used for the chickens, composted garden scraps and bokashi. This is my fourth year growing vegetables in the small polytunnel. I grow straight down, in ground level beds. The beds are mostly fertilized with bokashi compost, dug-down plant parts and a small amount of diluted urine. I had just been digging down bokashi compost before the samples were taken.
The large polytunnel was constructed in spring 2015 and I made large raised beds in there. The soil was very difficult to work with though since couch grass was growing everywhere. So, I decided to grow my vegetables in buckets on top of the covered weeds the first year. The soil is a lot easier to work with now. I grow in beds, buckets and pots filled with bokahsi compost and soil. I mainly use nettle water, diluted urine, bokashi compost and dug-down leaves as fertilizers. The samples were taken when quite a few winter vegetables were still in the ground, and I hadn't started fertilizing in preparation for summer yet.
Methods
The soil in my polytunnels is good, but it's less rich in nutrients and humus than the soil outside. There's one thing I need to do in order to get the same quality in here:
– From what I can see here, I think that it would be a great idea to start mulching in the polytunnels too, Anna says.
Two different methods have been used to analyze the soil. The AL method which gives you an idea of what the long-term supply of nutrients looks like, and the Spurway method which analyzes the short-term supply (which the plants can utilize quickly.) If you want to test your soil, I would recommend that you do both these tests since these "supplies" complement each other. A deficit in one can be compensated by the nutrients in the other.
This is what the tests show:
Nutrients and humus
Nutrients: The results for the small polytunnel are actually really good. The polytunnel soil conductivity value is 1.9 (should be between 1-3 for gardening soil.) A high number tells us that the soil is rich in nutrients. The soil conductivity value is 1.1 for the large polytunnel, which is still within range. But the soil outside was a whopping 4.9, so I'd like to get there if possible!
Anna tells me that my small polytunnel is doing quite well, which makes me so happy to hear! I need to make some improvements in the large polytunnel though. It seems that I'm low on phosphorus in there, 5 and 12 in the two tests. The number should be at least 30 in healthy soil. It's borderline deficient.
– The deficiency might not show on the plants, but they might need to struggle to get the phosphorus out of the ground, says Anna Pettersson Skog.
Phosphorus is really important for the root development and plant growth, so getting the phosphorus levels up is something I'll have to do to improve the polytunnel soil.
Magnesium is yet another important nutrient that I need to work on in the large polytunnel.
Humus: The soil outside contains about 21 % humus, but there's a lot less in the polytunnels. Around 10 % for both tunnels, which is what is usually recommended for gardening soil.
pH
pH: The pH value was 6.9 in my small polytunnel and 6.0 in the large one. This is very interesting. Gardening soil should preferably be in the range 6-7. The three spots in my garden are all within that range: A bit too high in the small polytunnel and a bit too low in the large one.
But why? Anna helps me figure out the reasons. She concludes that I use a lot of diluted urine in my large polytunnel, which might be the culprit. I think I use diluted urine here more than anywhere else in my garden.
– Urea will lower the pH, says Anna. You mostly use mulch in your beds outside which raises the pH. I think the low pH in the large polytunnel is a result of using diluted urine in there. I think the pH could be balanced if you start mulching more in there too!
The pH value is 6.3 in the beds outside.
Read more: Using diluted urine as a fertilizer
More mulch
I grow a LOT of vegetables in my polytunnels. The polytunnels produce food throughout the entire year. I let the polytunnel soil rest too of course, but not at the same time as the beds outside. It's really important to think about how to fertilize and find a way to add just the right amount in there.
The results have given me a lot to think about. I don't think I need to be worried or change something right away, but I've learned that I'd probably do even better if the nutrients in my polytunnel soil were properly balanced.
– It looks like mulching might just be the reason why the soil in your beds outside is so healthy, Anna says. The pH, humus and nutrients are very well balanced there. I think you should start mulching in your polytunnels too and see what happens then!
Anna believes that mulching might increase the levels of phosphorus and magnesium in the polytunnel soil. There's plenty of magnesium within the chlorophyll of plants. So fresh plant parts might be a good fertilizer. This would also affect the pH and the amount of humus in the soil.
It's the eighth season for the beds outside, but I've only been using my polytunnels for four years now. Anna and I talk about the fact that the soil outside has a bit of a head start. It will be interesting to see how the beds in the polytunnel will look in about five years, if I work on my mulching of course. Challenge accepted!
Read more: No-dig garden - Creating new raised beds
Why didn't I mulch?
I had already decided to start doing a lot more mulching in the polytunnels at the start of the season. Mostly because I was set on finding good, reliable methods for this setting. After talking to Anna, I went straight out to the polytunnel and got started on a new mulched bed for some of my winter vegetables. I'm very excited about it!
The main reason why I haven't been mulching so far, is that I don't have that much space to work with in the winter. It's more difficult to combine vegetables from different seasons in a smaller space. Mulching would make this space even smaller. I also had to take into account that I have quite a few snails in my polytunnels. I need to take care of that before I expand my mulching project any further. The drought this summer presented a few challenges. There wasn't enough grass clippings that I could use, for example. I feel very excited about working on it in the near future, even though I will need to start on a smaller scale of course. I'll write more about this soon!
Alternatives to mulch
Many of you might not be able to mulch as much as I do, or simply want to try a different method. I asked Anna Pettersson Skog about simple alternatives to mulching.
Anna tells me that store-bought manure, specifically cow manure, might be a good alternative. The manure adds some texture and life to the soil. Kitchen compost is also an option. You could start with store-bought soil, but the nutrients in them won't last the entire season. Anna tells me about a fertilizing method called the "permille method" which is based on research from the Swedish University of Agricultural Sciences. According to this method, you use a liquid fertilizer and add one permille to your watering can every time you water. A little bit of fertilizer often, that is.
– The vegetables will get exactly what they need at the moment if you use this method, Anna says. It works really well for people who grow their vegetables on their porch or in pallet collar beds or pots.
This method won't help build a nice storage of nutrients or humus in your soil though. It's simply a different way of fertilizing, I haven't tried it though.
Final thoughts
I've been wanting to test my soil for several years now. I'm so happy that I did this analysis and that the results were so good! The test results show me that I've managed to create a home for plenty of microbes, in addition to the fact that I've been able to grow beautiful vegetables for my family since 2011.
I feel worried about the ongoing soil depletion. We need to think more about the footprint that we are making in this world. Growing your own food is one way to make a difference. Knowing that it's possible to get great results with organic fertilizers you can make at home is amazing! Read more about self-sufficiency here: Self sufficiency: Growing a lot of vegetables.
I think it's possible to create lasting change that will make a difference for everyone. And I also believe that everyone can do something to make that happen. Me and my little lot of land might not look like much in a global sense, but I hope I can inspire others to grow their own food in a responsible way too! Then we make change together.
Thank you for reading this series about soil analysis and testing polytunnel soil! You can read more about mulching here on Sara's Kitchen Garden. Good luck with your soil!
/Sara Bäckmo
The tests:
The tests below are in Swedish, but the chemical symbols are the same in English too of course, so I hope you are able to get an idea of what the charts say.
*32 The beds outside
* 33 The small polytunnel
* 34 The large polytunnel
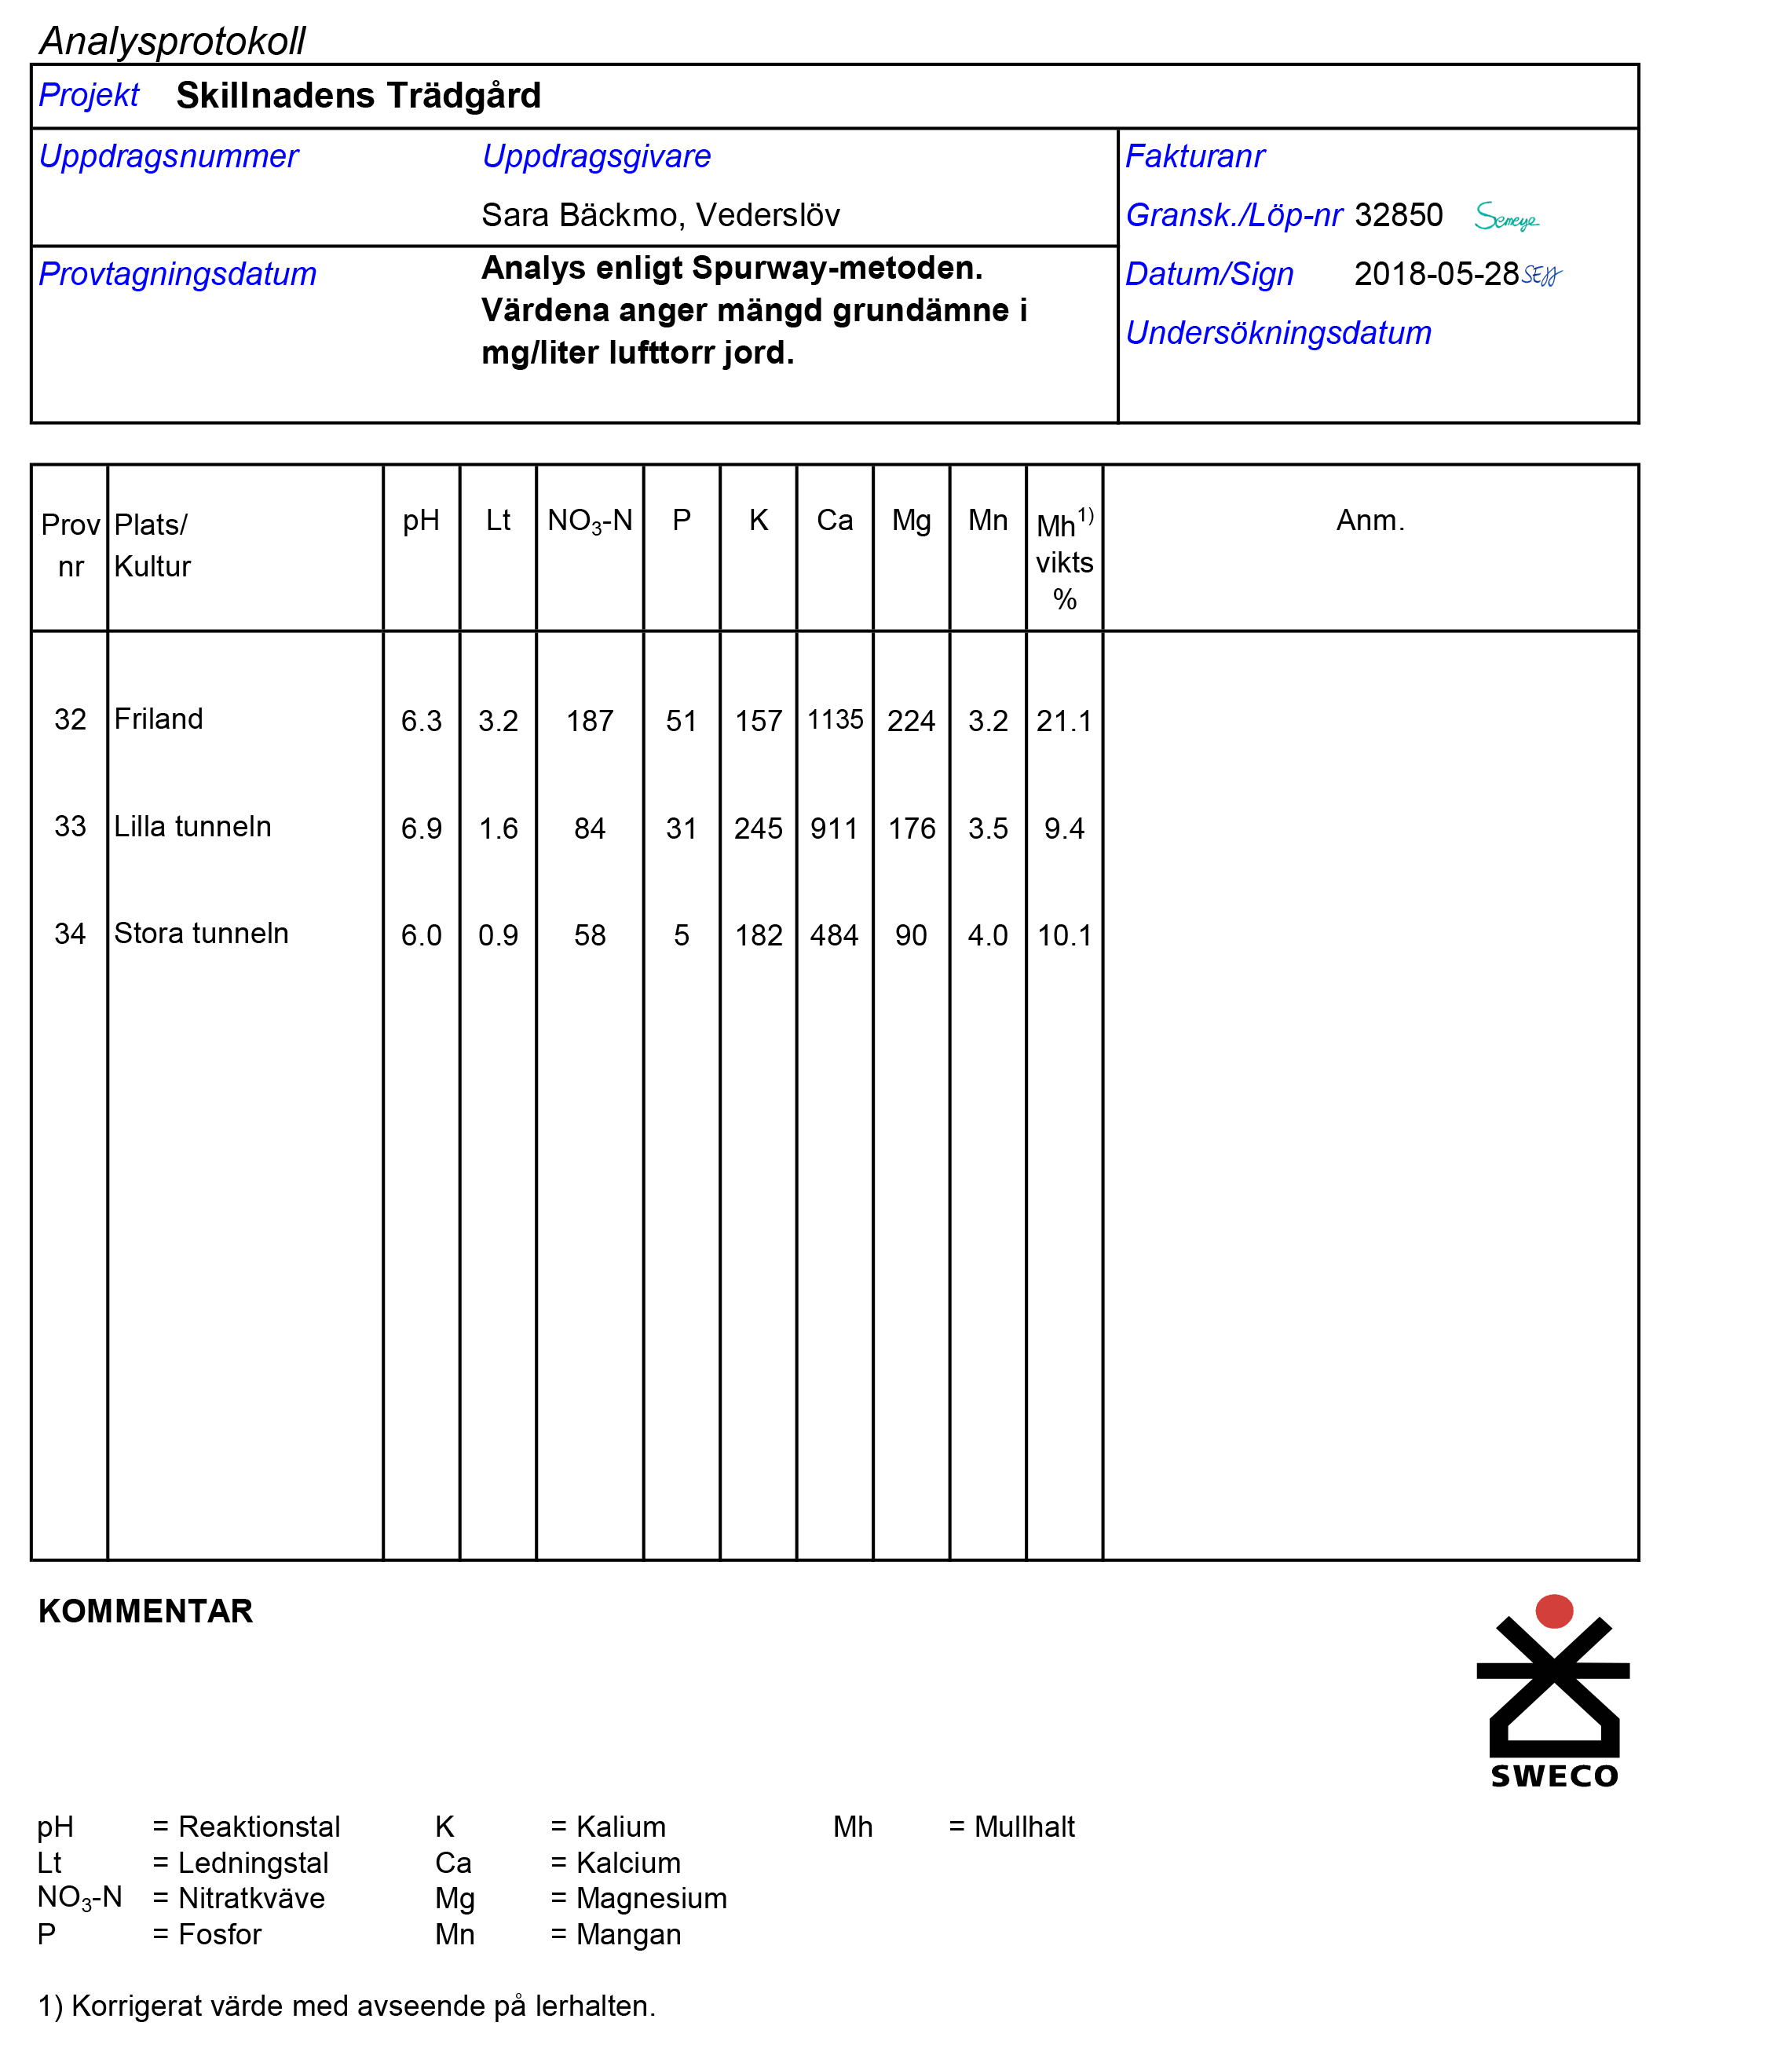
Nutrients in the soil samples.
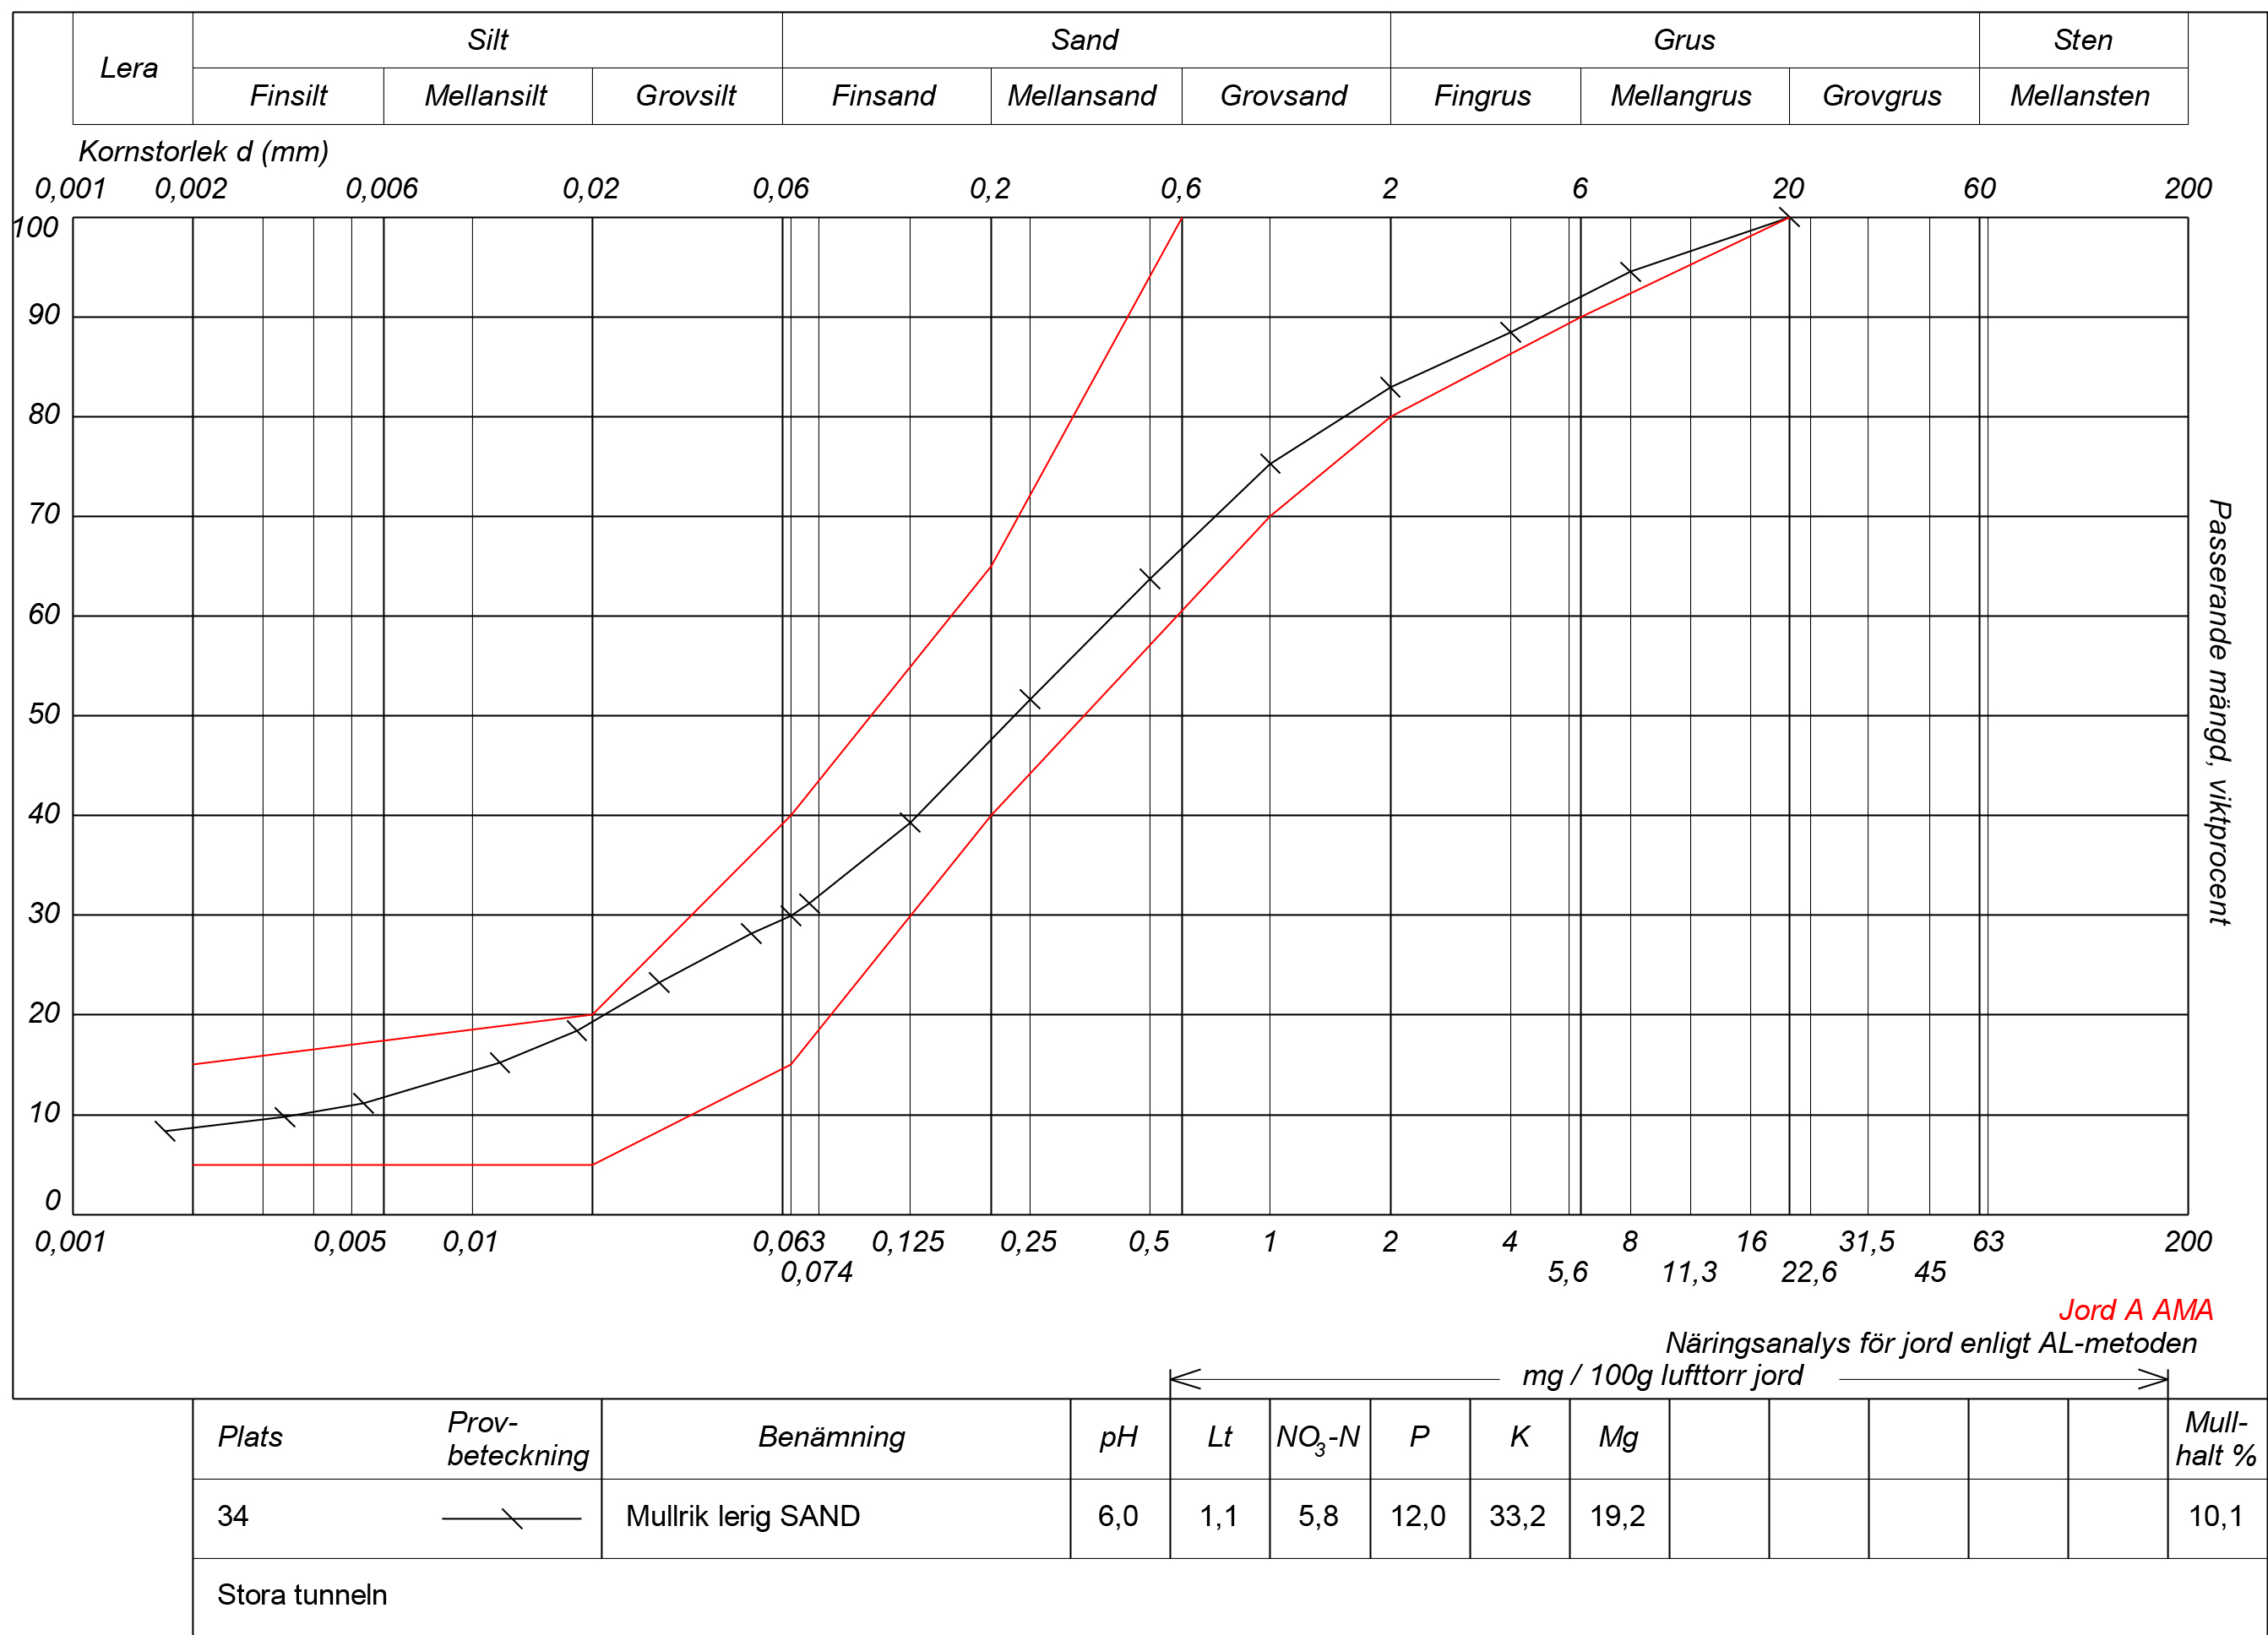
Polytunnel soil analysis, with the AL method. Large polytunnel.
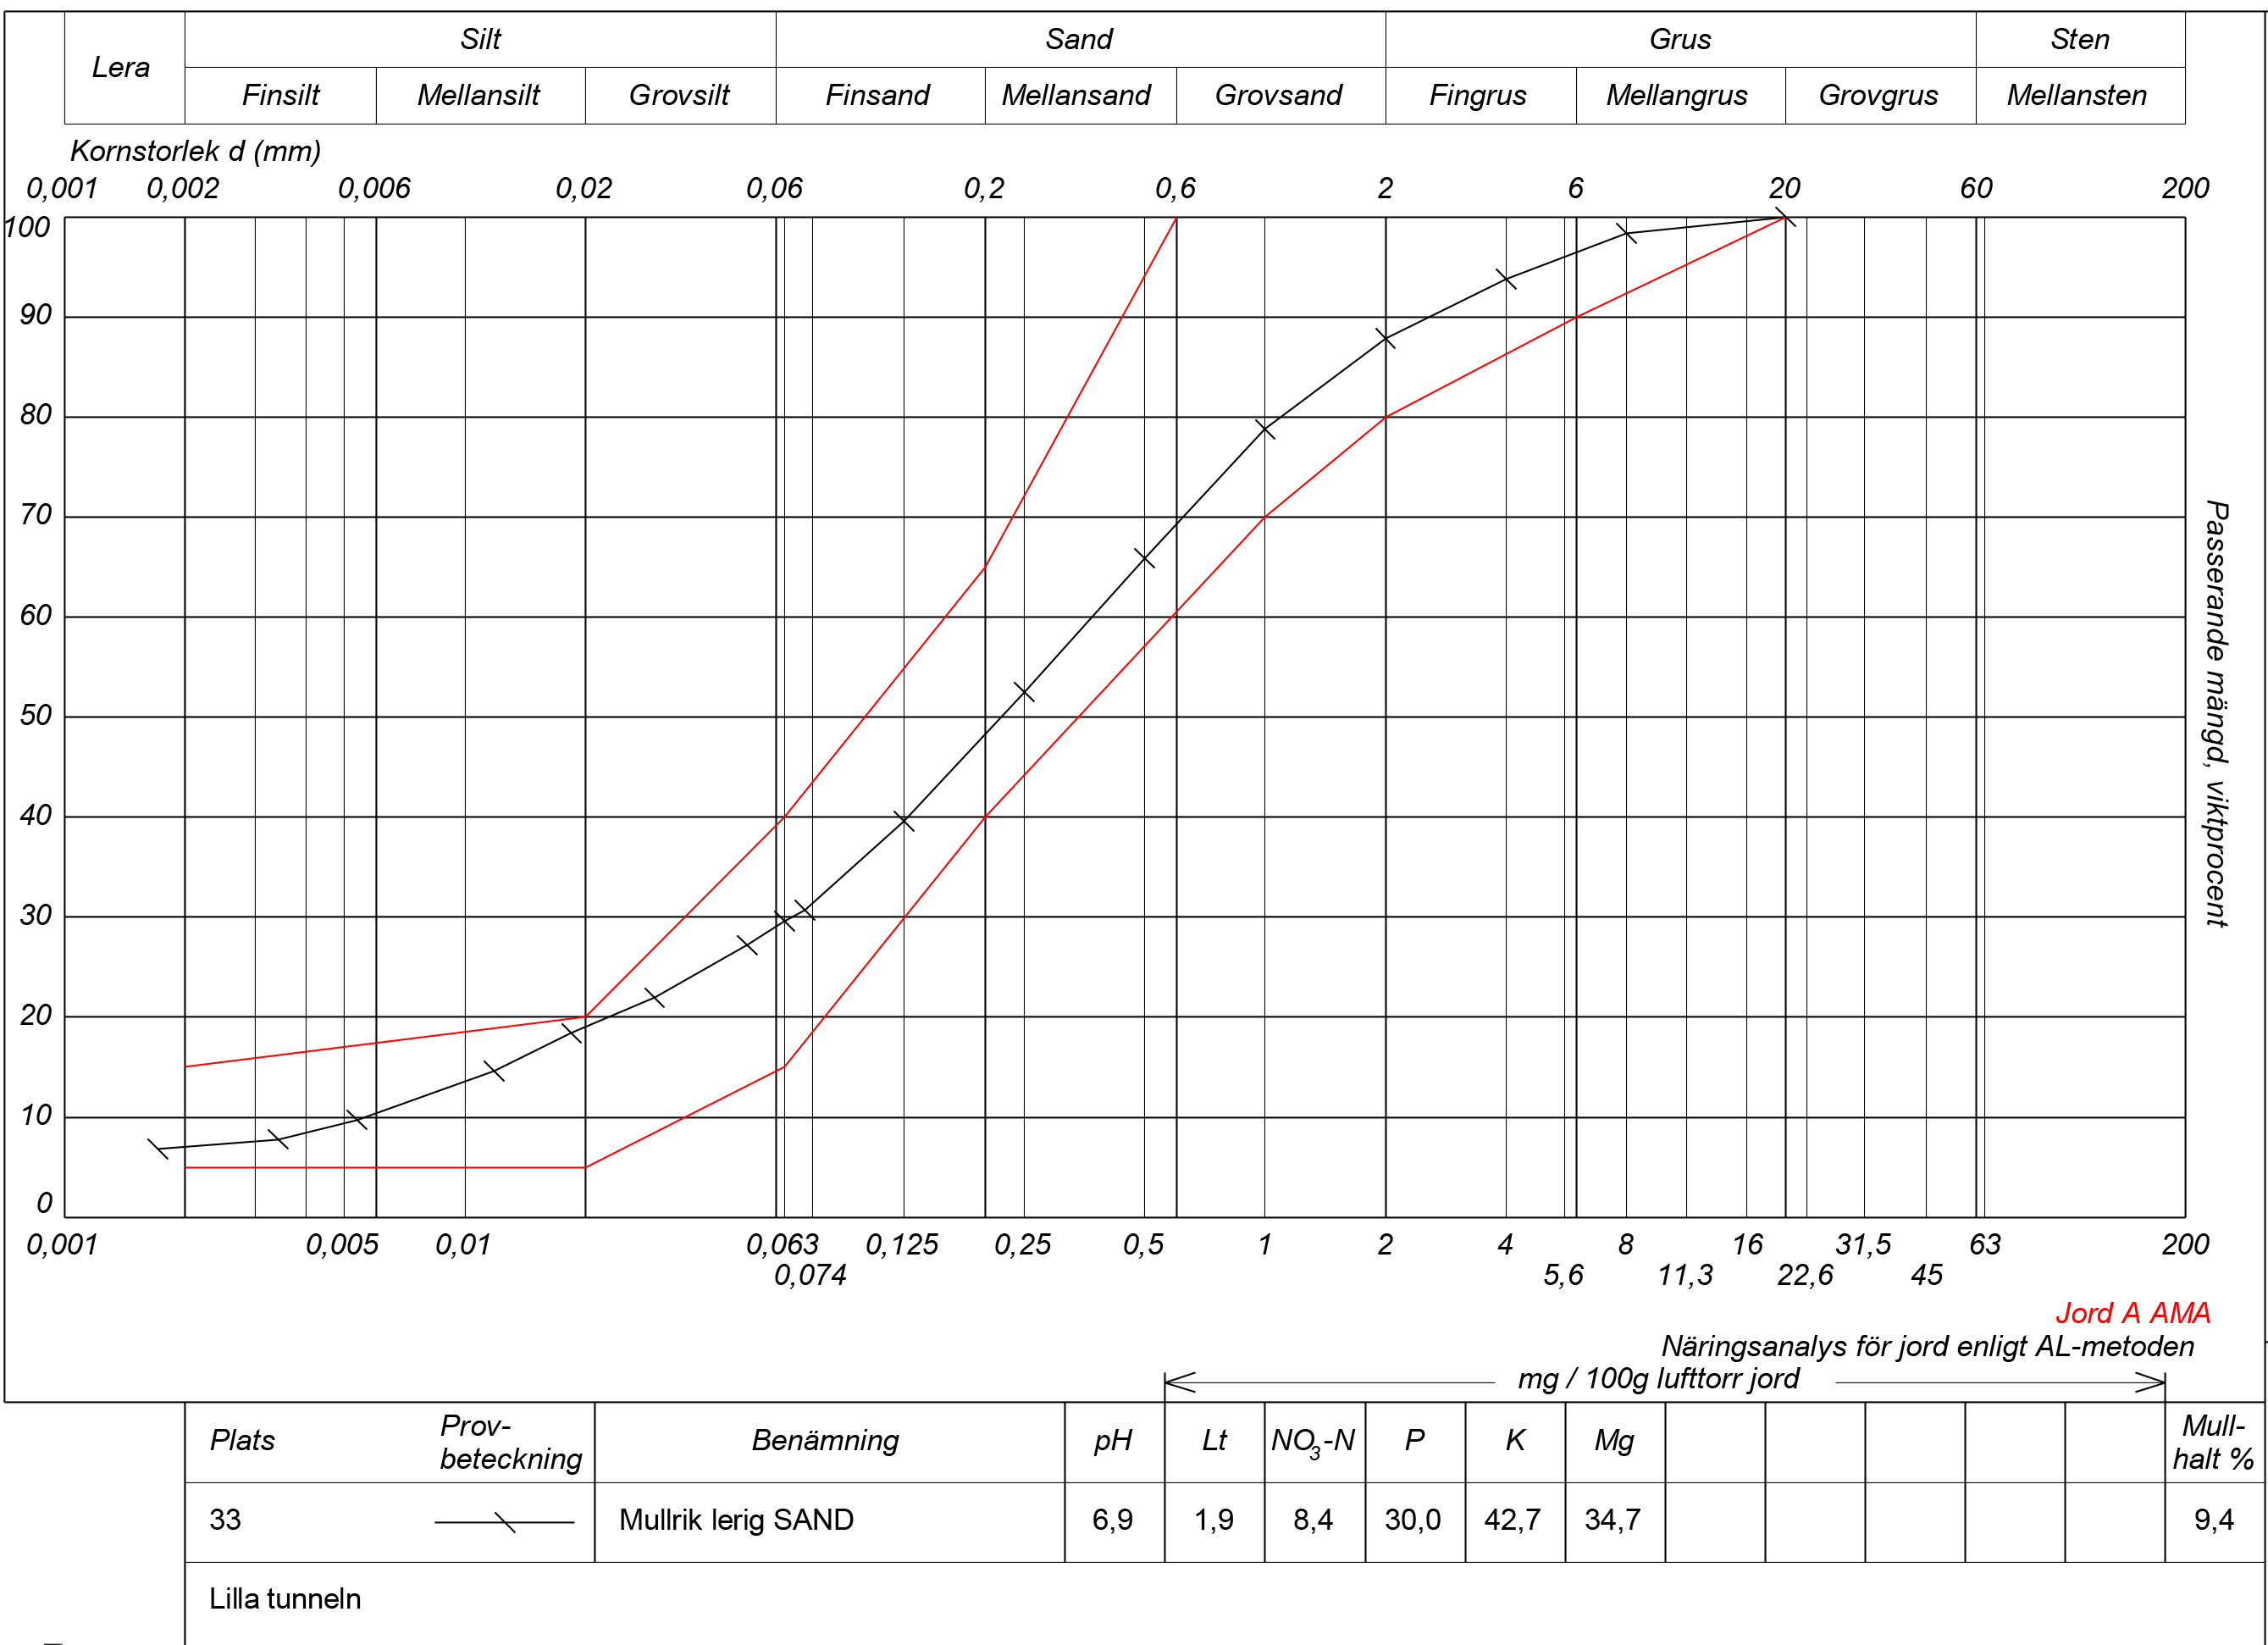
Soil analysis of the small polytunnel, made with the AL method.
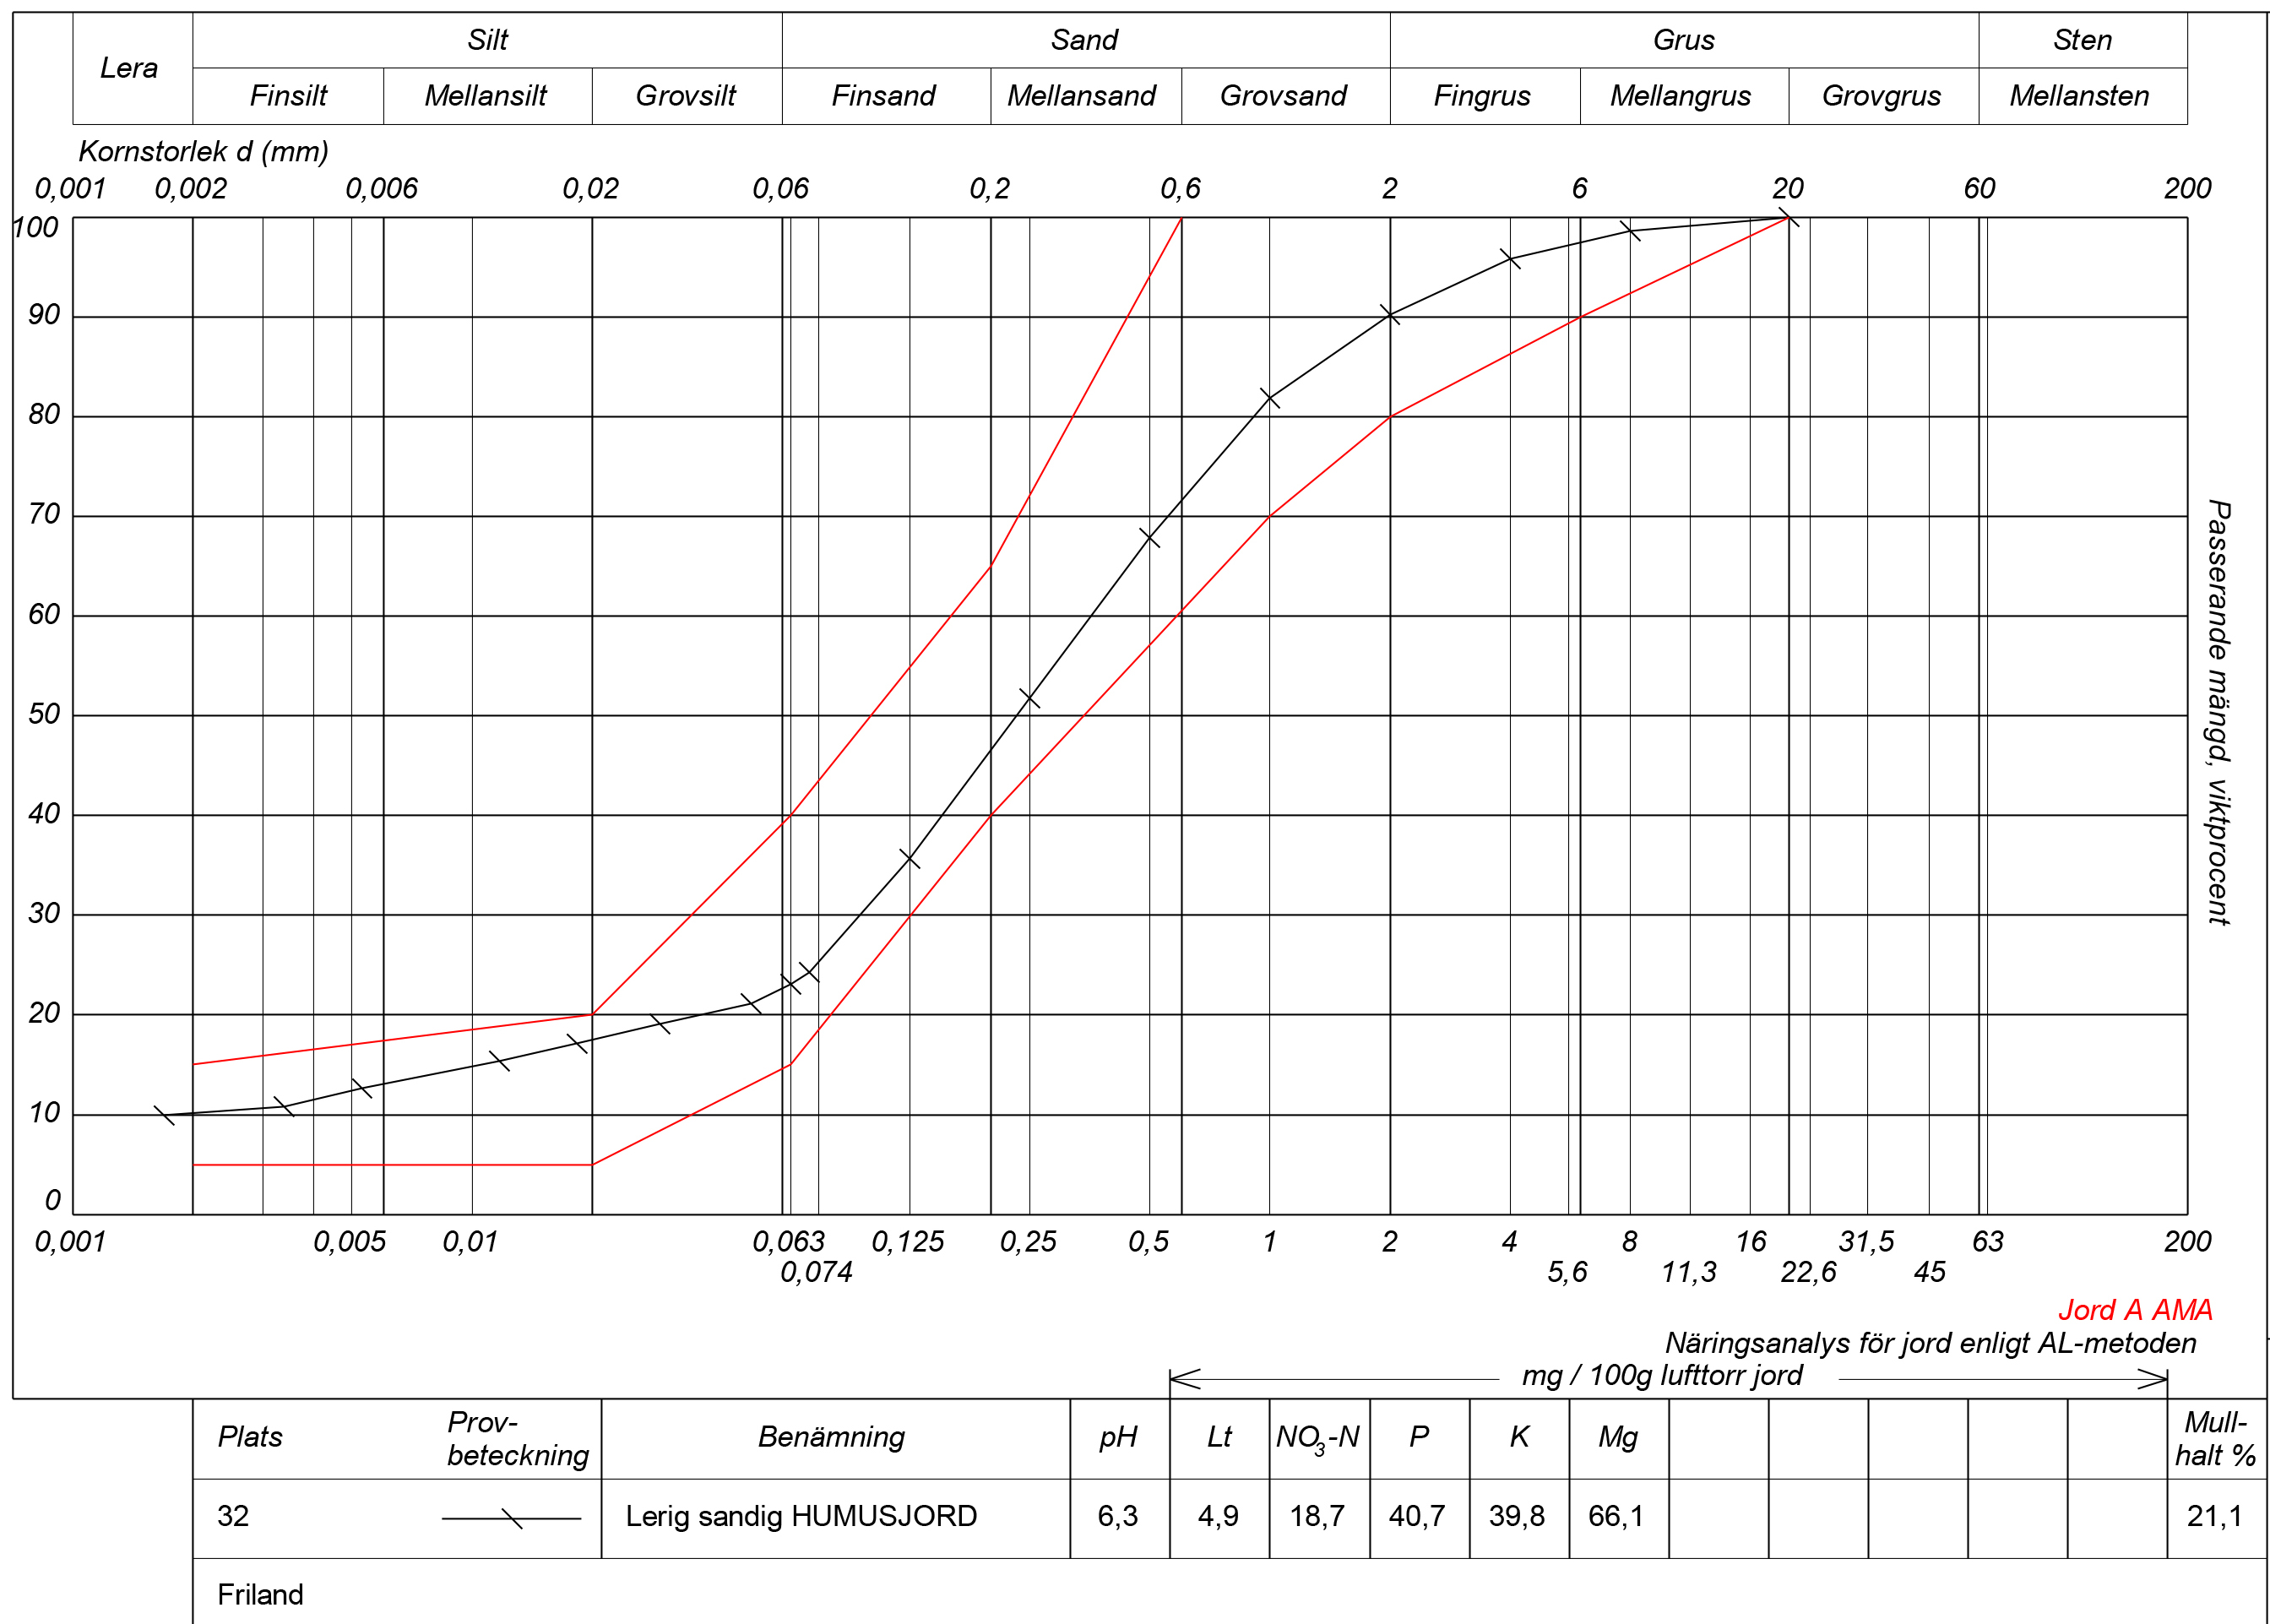
Analysis of soil samples from the beds outside, according to the AL method. This method measures the long-term supply of nutrients in the soil. The top field of the chart translates to: Silt, Sand, Gravel and Rock and the granularity of the different categories, from fine to coarse.
06. September 2021


Leave a Reply
You must be logged in to post a comment.